Settlers of Catan
A friend of us asked if it was possible to create a simple Settlers of Catan board generator. After some fiddling we had a basic concept working, with a random default board being generated and a click listener being placed on all the different tiles we could change images / colours of the tiles in a simple fashion.
We did however run into some difficulty when we wanted to distinguish between the images being clicked, because each line of the game board overlaps the line above. Formally: every line n overlaps line n-1 with the height of the triangular part of the image.
For those unfamiliar with the game board of the game , it basically is a hexagonal shape with hexagonic tiles representing wood, stone and other resources.
In our fiddle we turned the board around 90 degrees to make the hexagons 'face up'. But the technique we use is universal so it will work for any orientation and any shape.
Below we explain what we did and why we did it the way we did it. Our code is posted as a reference, and if you want to you can use it. I went through what we wrote and translated what I could find in Dutch to English, but there might be some words/variables that are still in Dutch.
Diving into the HTML
First of all lets create a very simple HTML5 page that will hold the game board.
As you can see the HTML is very simple, we include a stylesheet, jquery and our own script. The body of the HTML contains 2 divs. One with some text to explain what the page does, and one to hold our game board.
Some scripting
Now let us create the game board with all the shapes we want. We do this dynamically via Javascript to make it easier
There are multiple things happening in this function. first of we have a double for loop that runs through the board. We create 7 lines, all with 10 tiles, neatly tucked together. we use absolute element placement, because we are going to be calculating from the clicked div locations. Relative placing with negative margin-Top styling is also possible but makes the calculation more difficult.
The tiles
The tiles we create are 124pixels wide, and 138 pixels high. and are represented with 4 different divs. We have a 'global' div which is the Tile div, and in that div we distinguish 3 different divs, one for the top part, one for the middle part and one for the bottom part. This is necessary to be able to recognize which div is clicked.
By using 3 sub divs to describe the shape of the item, it is easy to work with either full CSS, or with images, because an image can be set to the background of the tile div, and the click listeners will still be useful on the sub divs.
The CSS tile styling
Basic onClick listener
In this example we work with CSS creation of the hexagon we not only need to change the colour of the clicked div but also of it's brothers. we know there are 3 children of which this is the middle one, so we can use the jQuery first() and last() functions on children of the parent.
The fun part:
All the basics are implemented, now we need to make a click listener that will work on the overlapping parts of the game board. To achieve that, we are going to focus on the top left part of the Tile and than specifically at the line between tile (1,2), and tile (2,3) where the numbers are equivalent to the coordinates of the tiles given in the id attribute of the div with class top in the respective tile divs.
If we click on the div with class top we click in bounding box y. half of the surface in the box is surface where we do not want the click listener to change the current tile (2,3) but where we want the click listener to change tile (1,2) or (1,3). First we focus on the right half of y. Basically we want all the clicks below the diagonal line to change the clicked tile, and all the clicks above the line to change tile (1,2).
A way to detect if the clicked location is below the line is by calculation of the angle from the clicked coordinates to the bottom left corner of the bounding box. because we know the specific dimensions of the hexagon, we can calculate the angle of the reference corner. In this case the height is 36px and the with is 124/2=62px. The reference angle is 30.14°. All calculated angles that are below 30.14° should make the clicked div change colour.
The theory looks solid
Getting the clicked location is the next thing we need to do. In jQuery when using the .click function the given parameter, in our case e is the click object. We can extract the coordinates of the click from that object
so we got the coordinates of the click location. they are numbers between (0,0) and (124,36). If we just blindly use these values we will not get the result we are hoping for. This is because in HTML elements in the DOM are referenced top down, left to right. which means that the origin to which we calculate the angle is not situated in the bottom left corner, but in the top left corner. So we have to map these values in such a way that the angle we calculate is the correct one.
We map the coordinates in the following way:
Now if a user clicks in the right part of the top div we want to also calculate the angle but in effect the angle should be calculated towards the bottom right corner in stead of to the bottom left corner. We have an extra mapping that we need to do to achieve this.
With all this knowledge in hand we know how to solve the issue and make sure that wherever we click on the tile the correct tile will be changed.
The complete on click function will look like this:
To summarise
As said this technique is multi-purpose. with the correct maths you can calculate anything you want. just keep in mind that every shape needs its own function to handle the exceptions and that the origin of the coordinates in HTML is located at the top left corner of the bounding box.
Live demo!
A friend of us asked if it was possible to create a simple Settlers of Catan board generator. After some fiddling we had a basic concept working, with a random default board being generated and a click listener being placed on all the different tiles we could change images / colours of the tiles in a simple fashion.
We did however run into some difficulty when we wanted to distinguish between the images being clicked, because each line of the game board overlaps the line above. Formally: every line n overlaps line n-1 with the height of the triangular part of the image.
For those unfamiliar with the game board of the game , it basically is a hexagonal shape with hexagonic tiles representing wood, stone and other resources.
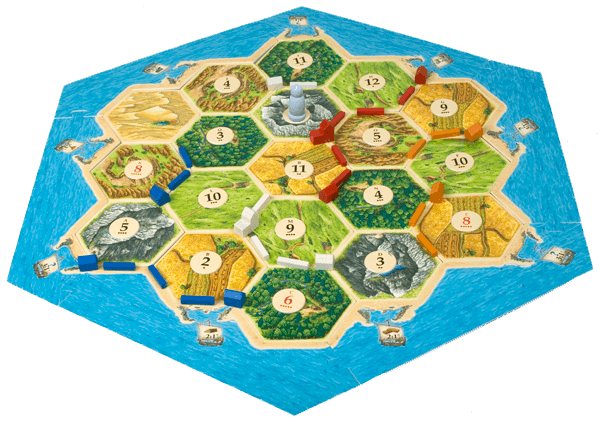 |
| Settlers of Catan game board |
In our fiddle we turned the board around 90 degrees to make the hexagons 'face up'. But the technique we use is universal so it will work for any orientation and any shape.
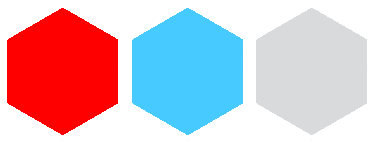 |
| Three hexagons in the orientation we use them |
Diving into the HTML
First of all lets create a very simple HTML5 page that will hold the game board.
<html>
    <head>
        <link rel="stylesheet" href="css/style.css"  charset="utf-8"/>
        <script src="./js/jquery.js" type="text/javascript"></script>
        <script src="./js/script.js" type="text/javascript"></script>
    </head>

    <body onload="javascript:placeshapes();">
        <div id="explanation">Click on a shape to make it change color</div>
        <div id="playingfield">
            <!-- playingfield will be generated here-->
        </div>
    </body>
</html>
As you can see the HTML is very simple, we include a stylesheet, jquery and our own script. The body of the HTML contains 2 divs. One with some text to explain what the page does, and one to hold our game board.
Some scripting
Now let us create the game board with all the shapes we want. We do this dynamically via Javascript to make it easier
function placeshapes(){

var top = 0;
    for (var x = 0; x < 7; x++){
        var left = 0;
        for (var y = 0; y < 10; y++){
            if (x%2 == 0){
                $('#playingfield').append("<div class='tile' style='position:absolute; left:"+ left+ "px; top: "+top+"px;'><div id='id"+ y +""+ x +"' class='top'></div><div class='middle'> </div><div class='bottom'> </div></div>");
            }else{
                $('#playingfield').append("<div class='tile' style='position:absolute; left:"+ (left+63)+ "px; top: "+top+"px;'><div id='id"+ y +""+ x +"' class='top'></div><div class='middle'> </div><div class='bottom'> </div></div>");
            }
            left+=126;
        }
        top+= 104;
    }
               ....

}
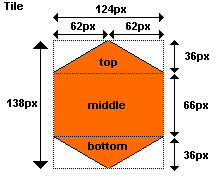 |
| Tile dimensions |
The tiles we create are 124pixels wide, and 138 pixels high. and are represented with 4 different divs. We have a 'global' div which is the Tile div, and in that div we distinguish 3 different divs, one for the top part, one for the middle part and one for the bottom part. This is necessary to be able to recognize which div is clicked.
By using 3 sub divs to describe the shape of the item, it is easy to work with either full CSS, or with images, because an image can be set to the background of the tile div, and the click listeners will still be useful on the sub divs.
The CSS tile styling
#playingfield{
width: 1330px;
height: 770px;
background-color: #0E71B4;
position: absolute;
left: 10px;
top: 50px;
}
.tile{Now our game board should look something like this:
height: 138px;
width: 125px;
position: absolute;
margin-left: 3px;
}
.tile .top {
width: 0;
border-bottom: 36px solid #6C6;
border-left: 62px solid transparent;
border-right: 62px solid transparent;
}
.tile .middle {
width: 124px;
height: 66px;
background: #6C6;
}
.tile .bottom {
width: 0;
border-top: 36px solid #6C6;
border-left: 62px solid transparent;
border-right: 62px solid transparent;
}
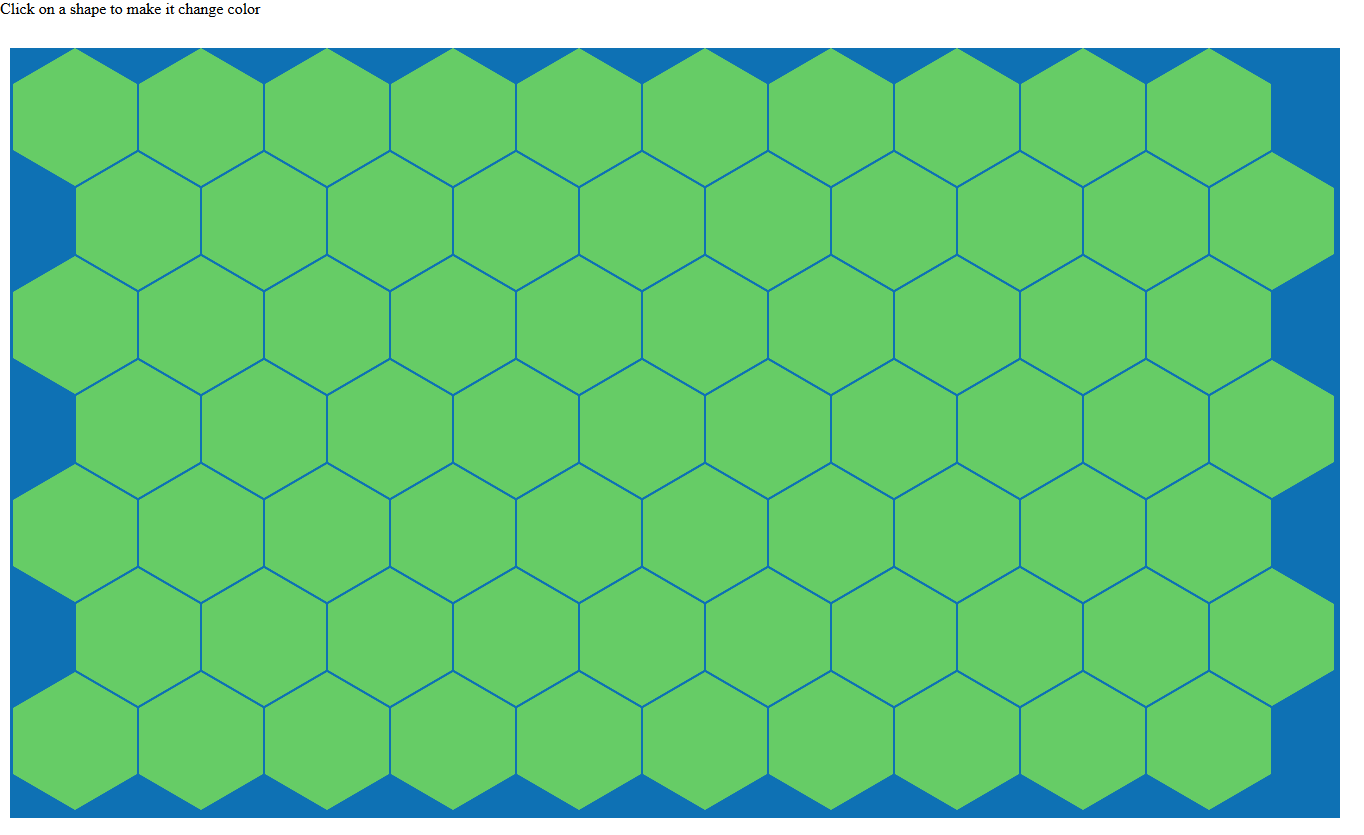 |
| generated gameboard |
Basic onClick listener
On to creating an onClick listener for all the tiles, to be able to make them change colourThis is the click listener for the middle part of the tile. We use an array with colours called colors that holds rgb values. This array can be changed to hold images, which can then be iterated and set to the parent of the clicked item.
$('.tile .middle').click(function(e){
    var i=0;
    for (i=0;i<colors.length;i++){
        if ($(this).css('background-color') == colors[i]){
            $(this).css('background-color',colors[((i+1)%colors.length)]);
            $(this).parent().children().first().css("border-bottom","36px solid "
              +colors[((i+1)%colors.length)]);
            $(this).parent().children().last().css("border-top","36px solid "
               +colors[((i+1)%colors.length)]);
            i= colors.length;
        }
    }
    return false;
});
In this example we work with CSS creation of the hexagon we not only need to change the colour of the clicked div but also of it's brothers. we know there are 3 children of which this is the middle one, so we can use the jQuery first() and last() functions on children of the parent.
The fun part:
All the basics are implemented, now we need to make a click listener that will work on the overlapping parts of the game board. To achieve that, we are going to focus on the top left part of the Tile and than specifically at the line between tile (1,2), and tile (2,3) where the numbers are equivalent to the coordinates of the tiles given in the id attribute of the div with class top in the respective tile divs.
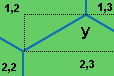 |
| bouding box y when clicked on div with class top. |
A way to detect if the clicked location is below the line is by calculation of the angle from the clicked coordinates to the bottom left corner of the bounding box. because we know the specific dimensions of the hexagon, we can calculate the angle of the reference corner. In this case the height is 36px and the with is 124/2=62px. The reference angle is 30.14°. All calculated angles that are below 30.14° should make the clicked div change colour.
The theory looks solid
Getting the clicked location is the next thing we need to do. In jQuery when using the .click function the given parameter, in our case e is the click object. We can extract the coordinates of the click from that object
var offset = $(this).offset();
var left = e.clientX - offset.left;
var leftold = left;
if (left> 62){
   //we use this for the right part of the top div
   left= 124-left;
}
var top = (-(e.clientY - offset.top))%36;
so we got the coordinates of the click location. they are numbers between (0,0) and (124,36). If we just blindly use these values we will not get the result we are hoping for. This is because in HTML elements in the DOM are referenced top down, left to right. which means that the origin to which we calculate the angle is not situated in the bottom left corner, but in the top left corner. So we have to map these values in such a way that the angle we calculate is the correct one.
We map the coordinates in the following way:
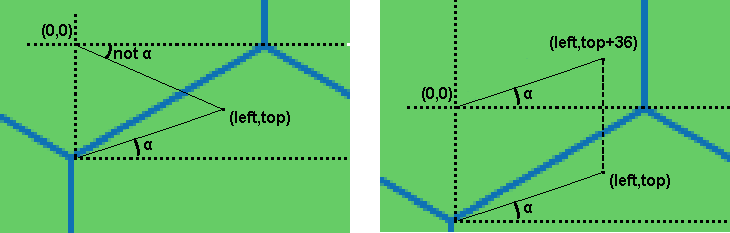 |
| Mapping to Origin |
 |
| Mapping to left part angle. after this mapping the mapping to the Origin still needs to be done. |
With all this knowledge in hand we know how to solve the issue and make sure that wherever we click on the tile the correct tile will be changed.
The complete on click function will look like this:
$('.tile .top').click(function(e){
    var offset = $(this).offset();
    var left = e.clientX - offset.left;
    var leftold = left;
    if (left > 62){
        //translation to left side
        left = 124-left;
    }

    var top = (e.clientY - offset.top);

    //translation to origin
    var rad2deg = 180/Math.PI;
    var tan = -Math.atan((top-36)/left) * rad2deg;

    if (tan < 30.14){
        // angle is smaller than reference angle so change
        // this div background color
        var i=0;
        for (i=0;i<kleuren.length;i++){
            if ($(this).parent().children().eq(1).css('background-color') ==
                  kleuren[i]){
                $(this).parent().children().eq(1).css('background-color',
                        kleuren[((i+1)%kleuren.length)]);
                $(this).parent().children().first().css("border-bottom",
                        "36px solid "+kleuren[((i+1)%kleuren.length)]);
                $(this).parent().children().last().css("border-top",
                        "36px solid "+kleuren[((i+1)%kleuren.length)]);
                i= kleuren.length;
            }
        }
    }else{
        //get id of clicked div for coordinate calculation
        var thisid = $(this).attr('id');
        var idarray = thisid.split("");
        if (idarray[3] == 0){
            //top row so we don't have to change color
            return false;
        }
        var help = idarray[3] - 1;
        var even = false;
        if (idarray[3]%2 == 0){
            even = true;
        }

        //angle is bigger, first check left side
        var id = "";
        if (leftold < 62){
            //construct id of div to change
            id = "#id" + idarray[2] + "" + help;
            if (even){
                if (idarray[2] > 0){
                    var help2 = parseInt(idarray[2])-1;
                    id = "#id" + help2 + "" + help;
                }else{
                    //left most column
                    return false;
                }
            }else{
                if (idarray[2] < 9){
                    id = "#id" + idarray[2] + "" + help;
                }else{
                    //right most column
                    return false;
                }
            }
        }else{ //then check right side
            id = "#id" + idarray[2] + "" + help;
            if (even){
                id = "#id" + idarray[2] + "" + help;
            }else{
                if (idarray[2] < 9){
                    var help2 = parseInt(idarray[2])+1;
                    id = "#id" + help2 + "" + help;
                }else{
                    //right most column
                    return false;
                }
            }
        }
        //change color of calculated div
        for (i=0;i<kleuren.length;i++){
            if ($(id).parent().children().eq(1).css('background-color') ==
             kleuren[i]){
                $(id).parent().children().eq(1).css('background-color',
                 kleuren[((i+1)%kleuren.length)]);
                $(id).parent().children().first().css("border-bottom",
                 "36px solid "+kleuren[((i+1)%kleuren.length)]);
                $(id).parent().children().last().css("border-top","36px solid "
                   +kleuren[((i+1)%kleuren.length)]);
                i= kleuren.length;
            }
        }
    }
    return false;
});
To summarise
As said this technique is multi-purpose. with the correct maths you can calculate anything you want. just keep in mind that every shape needs its own function to handle the exceptions and that the origin of the coordinates in HTML is located at the top left corner of the bounding box.
Live demo!